Today I will show one of the most important tools for any developer or non-developer: The ONE password manager you can trust, pass, the linux utility. It can work unencrypted, but it usually works along GPG. The Android version of pass is Password Store. This app needs to be used along Open Keychain. You can install both from the F-Droid store.
Notable mention to this excellent guide. It is slightly outdated, but had it not been for minor differences in the app it would have been all I needed to do a setup.
This is the main diagram to understand the pieces we are using:
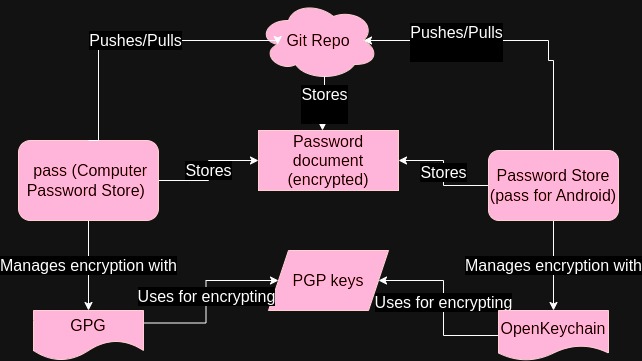
The point of this setup is:
- Our passwords are stored in a git repo, but we don’t really care if the file itself is ever compromised. The file is encrypted with a
PGP key, so until quantic decryption exists that is not a concern. - The
PGP keysonly need to be shared ONCE, at the beginning. Once the setup is done the password file can be edited as you wish, the synchronized with git. - We are using
pass/Password Store, which follow a minimalistic design philosophy (simpler code == less exploit risk). This applies toGPG/OpenKeychainas well pass/Password Storecopy a password to your clipboard with a timeout. Your clipboard by default clears after 45 seconds, and since the password is not shown (unless you actually paste it elsewhere) you could even be streaming yourself inputting passwords with no risk.- With a small amount of tools (I will mention
passmenuforpass) you have one of the safest and more comfortable to use setups. Pass/GPGare tools that will take FOREVER to get old. They are finished tools that change extremely slow if ever.- Working (temporarily) without internet (or github access) is not an issue since everything is really stored locally, and synced with git.
1. Computer setup:
1.1 Previous setup
Have pass and gpg in
stalled in your Linux system (optionally adb to push your key files to your android phone through it). Have a repo setup in some git system like Github.
Initializing all programs
1.2 Generate your keys
After the basic installs, we have to set up everything. The first step if you have no idea on how to use gpg is to generate the keys with it. gpg uses a private/public pair of keys; which right now is considered a best practice in security. We can generate a pair of keys by running:
gpg --full-gen-key
I personally used the option of “ECC (sign and encrypt)” for the kind of key and “Curve 25519” which were the defaults. I made the keys not to expire (which is more dangerous but for this specific tutorial is not so relevant).
To make things simpler, just call your keys “password-store” for Real name and you can input any email you want. Comments are of course for your own reminding.
A big warning is that as of now, OpenKeychain does not support the AEAD mechanism. In order to avoid this issue do as the ArchLinux wiki suggests:
gpg --export --edit-key <FINGERPRINT> -> where FINGERPRINT is the long alphanumeric code of your key
setpref AES256 AES192 AES SHA512 SHA384 SHA256 SHA224 ZLIB BZIP2 ZIP -> We remove OCB as a prefix
exit -> to exit gpg editing mode, and press y to save changes.
1.3 Initialize pass
As simple as:
pass init <FINGERPRINT>
Now you can get the full use of a (local) password manager:
pass generate somepassword -> Generate a password on the top level. The password generation system is as good as it gets.
pass generate somepath/somepassword
pass somepassword -> To show on terminal password.
passmenu -> Requires dmenu, but opens a searchbar for your passwords, and upon pressing enter copies it in your clipboard. NOBODY can see your password.
1.4 Link your local pass repo to github
Once again it is very simple to do:
pass git remote add origin git@github.com:your-username/Git-Repo-Name.git
And now we can use pass as if it was a git repo running git commands after it.
pass git add -A && pass git commit -m 'first bunch of passwords' && pass git push <- Try and add your first set of passwords so that we can set it later in Android.
2. Android setup
We must begin by installing both apks(OpenKeychain, Password Store) from the F-Droid store.
2.1 Passing the key, setting up OpenKeychain
You should export your PGP key in a safe way; that means either
- Create Another Key (Key 2) on the OpenKeychain, pass the public key in any way (Whatsapp, email, IP over Avian Carrier) to your PC. Now you would encrypt (in the PC) with the password-store keys with Key2, send it to the phone, unencrypt them using OpenKeychain (on the phone); then import them onto OpenKeychain. This method is covered in the tutorial I linked
- Alternatively, if you are comfortable with
adb, you can just send the unencrypted keys over it:
gpg --export password-store > password-store.sec.asc
gpg --export-secret-keys password-store >> password-store.sec.asc
adb push password-store.sec.asc /sdcard/Download/
And import it directly with OpenKeychain.
2.2 Linking to the repo, setting up Password-Store
This will be done from the Password-Store apk. You will choose “clone a remote repo”. You want to set up your link exactly the same way as you set it for pass, using the link git@github.com:your-username/Git-Repo-Name.git. Besides that, you will have to select your key from OpenKeychain when prompted to do so.
A couple notes on the last setup:
- On many Chinese phones, you need to disable some settings for these two apps to work. In my case I used a Unihertz so I had to go “Settings > Intelligent assistance > App blocker” and allow my apps to run freely. Android is a mess.
- Optionally, you can set up its own SSH key for pulling from git. For security reasons (phones are the most privacy-aggressive devices with the least control over what they run) I personally do not allow my phone to edit my git repo and only generate passwords from a real PC. You may want to consider that.
3 Warnings:
passwill work just fine with expired keys (you can extend them and decrypt); OpenKeychain will refuse to decrypt with an expired key, or to decrypt a password that has been generated after a key expired. It is usually bad practice but for password-store you may want to set up PGP keys that never expire.- BACKUP YOUR KEYS. BACKUP YOUR KEYS. BACKUP YOUR KEYS. Remember that you will be reliant on them for all your very complicated passwords. If you lost your passwords AND any recovery ways, you can be in a very bad place. To backup your keys on pc, you can regularly copy your
.gnupgfolder that is in your home (~), in your user to somewhere else.
If this was helpful to you consider dropping a star on some of my projects https://github.com/xarxaxdev/ or donating. I am planning to keep this website as a personal blog and to document my projects or useful tech stuff.
Donation:
49va5kaQ8qzQjfNpTjURwiFR9Zh1uQQsT5cbnnur2NUsfzCbU1QQ2tG3PhdeapEGFTLuGMcx46ss6grJTKKFfP8EC1ePk9M